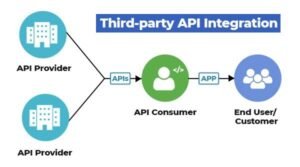
Integrating third-party APIs into your application can significantly enhance its functionality by adding features and accessing external data or services. APIs (Application Programming Interfaces) allow your application to communicate with other services, making it possible to extend capabilities without building everything from scratch. This guide will walk you through the process of integrating third-party APIs, including obtaining access, making requests, and handling responses.

Step 1: Choose the Right API
- Identify Your Needs
- Determine what features or data you need that a third-party API can provide. For instance, you might need weather data, payment processing, or social media integration.
- Research APIs
- Look for APIs that meet your requirements. Popular API directories include RapidAPI, ProgrammableWeb, and API List.
- Review Documentation
- Check the API documentation to understand how it works, including available endpoints, request formats, and response structures. Good documentation is crucial for successful integration.
Step 2: Obtain API Access
- Register for an API Key
- Most APIs require an API key for authentication. Register for an API key through the service provider’s developer portal. For example, to use the Google Maps API, you need to create a Google Cloud project and obtain an API key.
- Understand Authentication Methods
- Different APIs use various authentication methods, such as API keys, OAuth tokens, or Basic Auth. Ensure you understand how to authenticate requests.
Step 3: Make API Requests
- Set Up Your Development Environment
- Ensure your development environment is ready for making API requests. For most web applications, you’ll use JavaScript with tools like
fetchoraxiosto handle HTTP requests.
- Ensure your development environment is ready for making API requests. For most web applications, you’ll use JavaScript with tools like
- Make a Request
- Use JavaScript to make an HTTP request to the API endpoint. Here’s an example using the
fetchAPI to get data from a hypothetical weather API:
javascriptconst apiKey = 'YOUR_API_KEY';
const city = 'New York';
const url = `https://api.weatherapi.com/v1/current.json?key=${apiKey}&q=${city}`;fetch(url)
.then(response => response.json())
.then(data => {
console.log('Weather Data:', data);
})
.catch(error => {
console.error('Error:', error);
});
In this example:
- Replace
'YOUR_API_KEY'with your actual API key. - Adjust the URL to match the API endpoint you’re using.
- Use JavaScript to make an HTTP request to the API endpoint. Here’s an example using the
- Handle Errors
- Implement error handling to manage issues like network errors or invalid responses. Always check for successful HTTP status codes and handle errors gracefully.
Step 4: Process and Display Data
- Parse the Response
- After receiving the response, parse the data to extract the information you need. Most APIs return data in JSON format, which can be parsed using JavaScript’s
JSON.parse()method or directly if usingfetch.
- After receiving the response, parse the data to extract the information you need. Most APIs return data in JSON format, which can be parsed using JavaScript’s
- Integrate Data into Your Application
- Use the parsed data to update your application’s UI or perform other actions. For instance, display weather information on your website or process payment confirmations.
- Optimize Data Handling
- Optimize how you handle and display data to ensure good performance and user experience. For example, avoid blocking the main thread with large data operations and use asynchronous techniques.
Step 5: Test and Debug
- Test Your Integration
- Thoroughly test the API integration to ensure it works as expected. Check for correct data handling, UI updates, and error scenarios.
- Debug Issues
- Use browser developer tools, logging, and debugging tools to troubleshoot any issues with API integration. Pay attention to console errors and network requests to diagnose problems.
Step 6: Maintain and Update
- Monitor API Usage
- Keep track of your API usage and stay within any rate limits or quotas set by the API provider. Some APIs have usage limits that could affect your application if exceeded.
- Handle API Changes
- API providers occasionally update their endpoints or authentication methods. Monitor any changes to the API documentation and update your integration accordingly.
- Ensure Security
- Secure your API keys and sensitive data. Avoid exposing API keys in client-side code and use environment variables for server-side applications.
Example: Integrating a Payment API
To illustrate the integration process, here’s a brief example using a payment API like Stripe:
- Obtain API Keys
- Sign up for Stripe and get your API keys from the Stripe Dashboard.
- Include Stripe’s Library
- Include Stripe’s JavaScript library in your HTML:
html
<script src="https://js.stripe.com/v3/"></script>
- Include Stripe’s JavaScript library in your HTML:
- Set Up Stripe Integration
javascript
const stripe = Stripe('YOUR_PUBLISHABLE_KEY');
const elements = stripe.elements();
const card = elements.create('card');
card.mount('#card-element');document.querySelector('#payment-form').addEventListener('submit', async (event) => {
event.preventDefault();
const {token, error} = await stripe.createToken(card);
if (error) {
console.error('Error:', error);
} else {
console.log('Token:', token);
// Send token to your server for processing
}
});
In this example:
- Replace
'YOUR_PUBLISHABLE_KEY'with your actual Stripe publishable key. - Handle the form submission to create a token and send it to your server for payment processing.
- Replace
Conclusion
Integrating third-party APIs into your application can greatly enhance its functionality and provide valuable features and data. By following these steps—choosing the right API, obtaining access, making requests, processing data, and maintaining the integration—you can successfully incorporate external services into your applications. Always stay updated with API documentation and best practices to ensure a smooth and secure integration process.


