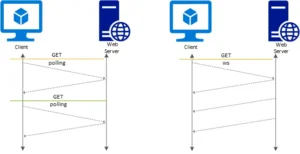
Real-time updates are essential for modern web applications, especially those that require live data, such as chat applications, live tracking systems, or financial dashboards. This article explores two primary methods for implementing real-time updates: WebSockets and APIs. Each approach has its strengths, and understanding both will help you choose the best solution for your needs.

Understanding WebSockets
WebSockets provide a full-duplex communication channel over a single TCP connection. Unlike traditional HTTP requests, WebSockets allow for continuous, bidirectional communication between the client and server, making them ideal for real-time applications.
1. Setting Up a WebSocket Server
To use WebSockets, you first need to set up a WebSocket server. Here’s a basic example using Node.js with the ws library:
- Install the
wsLibrary- Open your terminal and install the
wslibrary using npm:bashnpm install ws
- Open your terminal and install the
- Create a WebSocket Server
- Create a file named
server.jsand add the following code:javascriptconst WebSocket = require('ws');
const server = new WebSocket.Server({ port: 8080 });server.on('connection', (socket) => {
console.log('New client connected');socket.on('message', (message) => {
console.log(`Received message: ${message}`);
socket.send(`Server received: ${message}`);
});socket.on('close', () => {
console.log('Client disconnected');
});
});console.log('WebSocket server is running on ws://localhost:8080');
- Create a file named
2. Connecting to the WebSocket Server
- Create an HTML Client
- Create an
index.htmlfile and include the following JavaScript to connect to the WebSocket server:html<!DOCTYPE html>
<html lang="en">
<head>
<meta charset="UTF-8">
<meta name="viewport" content="width=device-width, initial-scale=1.0">
<title>WebSocket Client</title>
</head>
<body>
<h1>WebSocket Example</h1>
<input type="text" id="message" placeholder="Type a message">
<button onclick="sendMessage()">Send</button>
<div id="responses"></div>
<script>
const socket = new WebSocket('ws://localhost:8080');socket.onopen = () => {
console.log('Connected to the WebSocket server');
};socket.onmessage = (event) => {
document.getElementById('responses').innerHTML += `<p>${event.data}</p>`;
};function sendMessage() {
</script>
const message = document.getElementById('message').value;
socket.send(message);
}
</body>
</html>
- Create an
3. Running Your WebSocket Server
- Start the server with Node.js:
bash
node server.js
- Open
index.htmlin your browser and interact with the WebSocket server.
Using APIs for Real-Time Updates
APIs can also be used to fetch real-time data, typically through polling or server-sent events (SSE).
1. Polling
Polling involves repeatedly sending HTTP requests at regular intervals to check for updates.
- Setting Up a Polling Client
- Create an
index.htmlfile with JavaScript to periodically fetch data:html<!DOCTYPE html>
<html lang="en">
<head>
<meta charset="UTF-8">
<meta name="viewport" content="width=device-width, initial-scale=1.0">
<title>Polling Example</title>
</head>
<body>
<h1>Polling Example</h1>
<div id="data"></div>
<script>
function fetchData() {
fetch('https://api.example.com/data')
.then(response => response.json())
.then(data => {
document.getElementById('data').innerHTML = `<p>${JSON.stringify(data)}</p>`;
})
.catch(error => console.error('Error fetching data:', error));
}setInterval(fetchData, 5000); // Fetch data every 5 seconds
</script>
</body>
</html>
- Create an
2. Server-Sent Events (SSE)
SSE provides a way for servers to push updates to clients over an HTTP connection.
- Setting Up SSE Server
- Create a file named
sse-server.jswith the following code:javascriptconst http = require('http');const server = http.createServer((req, res) => {
if (req.url === '/events') {
res.writeHead(200, {
'Content-Type': 'text/event-stream',
'Cache-Control': 'no-cache',
'Connection': 'keep-alive'
});setInterval(() => {
res.write(`data: ${JSON.stringify({ time: new Date() })}\n\n`);
}, 1000);
} else {
res.writeHead(404);
res.end();
}
});server.listen(8080, () => {
console.log('SSE server running on http://localhost:8080/events');
});
- Create a file named
- Connecting to SSE Client
- Create an
index.htmlfile with JavaScript to handle SSE:html<!DOCTYPE html>
<html lang="en">
<head>
<meta charset="UTF-8">
<meta name="viewport" content="width=device-width, initial-scale=1.0">
<title>SSE Example</title>
</head>
<body>
<h1>Server-Sent Events Example</h1>
<div id="events"></div>
<script>
const eventSource = new EventSource('http://localhost:8080/events');eventSource.onmessage = (event) => {
document.getElementById('events').innerHTML += `<p>${event.data}</p>`;
};eventSource.onerror = (error) => {
</script>
console.error('Error with SSE:', error);
};
</body>
</html>
- Create an
3. Running Your SSE Server
- Start the SSE server with Node.js:
bash
node sse-server.js
- Open
index.htmlin your browser to see real-time updates.
Conclusion
WebSockets and APIs are powerful tools for implementing real-time updates in web applications. WebSockets offer continuous, bidirectional communication, ideal for applications requiring constant data exchange. APIs, on the other hand, can deliver real-time updates through polling or server-sent events, providing flexibility for various use cases. By understanding and leveraging these technologies, you can build dynamic, responsive applications that provide users with live, up-to-date information.


